Friday, July 27, 2012

Jewelry Organization

For the last few months I've been on a major organization kick around our house.  I'm tired of some of the clutter in our closets, garage and other places.  I'm also realizing how much stuff we have that we never use.  So my new motto is: "If we aren't using it, let's get rid of it."  I know this is obvious and should be something that is practiced without it being some big change, but well with the craziness that takes on our everyday lives with work being busy and us going out of town many weekends, it's surprising how fast junk can accumulate before we even realize it.

Mission Organization has been in place and well it's gone pretty good so far.  Slowly but surely changes are happening.  I haven't posted them, but we've cleaned out our garage so that we can actually walk in there and could even park a car if we wanted to (you know use the garage for what it's made for).  Awesome!  I hosted a garage sale with a friend and walked away with $165 in my pocket...all for old clothes and other stuff that was lying around but now someone else can actually use it.  Now, most recently, I've organized my jewelry and actually snapped some pics on my phone (meaning not the best pictures) in the process to show you.


You can make this jewelry display board in five easy steps!

STEP 1: Gather Supplies - Foam board, linen or other fabric, tape measurer, x-acto knife, pen or marker, hot glue gun and cup hooks.

Step 2: Measure the foam board to the size you want.

Step 3: Cut the foam board using the x-acto knife.  In my case I wanted two pieces, so I cut the board in half.  Gus did a fabulous job assisting me with this to make sure I didn't hurt myself!

Step 4: Wrap the fabric tightly around the board and using the hot glue gun, secure the corners and edges on the back side of the board.

Step 5: Screw in the cup hooks where you want them on your board.  I used the x-acto knife to make little slits in the fabric and board so that the fabric wouldn't bunch up where I was scewing in the hooks.

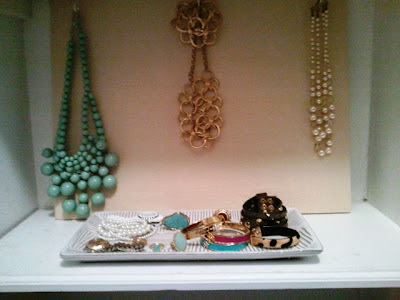
Ta-da!  You now have a beautiful and easy way to store your jewelry.  For me, this works so much better than drawers as I find myself not using what I don't easily see, and I tend to not put jewelry back in it's place if it's not easy.  This has been working great so far! 

I designated two of my shelves in my closet for my jewelry.  I just leaned the boards agains the back of the wall, and then I used a plate and some bowls from West Elm to display my earrings, bracelets and rings.


Hope you enjoyed getting a peak at my new jewelry organization!!

Have a fabulous weekend. XO,
Tara

Wednesday, July 11, 2012

Yard Makeover

This is long overdue, but this Spring we had our front and back yards spruced up.  Due to the drought last year and also our wonderful dog, Gus, our yard was in serious need of a makeover to get it back to it's original beauty.  When we first bought our house, there was beautiful landscaping around the backyard, and well as you'll soon see after Gus ran circles in the yard and dug holes, the landscaping didn't fare too well.  We were ready to re-claim the space and make it look nice, or at the very least, have grass again.

Here is the BEFORE of the back yard of our house:

(if you can even call it a yard with all of the dirt!)


and moving to the BEFORE of the front yard:


..................................................................................................
Now here's the AFTER of our front yard:


and now the AFTER of the back yard:


What we did (or had done!):

  • Laid sod.  Of course with the heat it didn't take too well at first, but it's coming along a lot better now with plenty of watering and some fertilizing.  We still need to add a little more in the back left corner by the tree so it will be complete.  So much better than all of the dirt we had before!
  • Had rocks placed along the house and garage instead of flower beds as it wasn't good for the dirt to be right up against the wood siding.
  • Re-did flower beds in front of the house and along the back of the fence in the back yard, which involved replacing existing plants with new plants to add more color when in bloom. 
  • Added some potted plants for color in the backyard (of course I need to add more) and added topiaries on each side of the front door to make the entry more welcoming.
  • Put up a kennel behind the garage so Gus has his own home when he has to stay in the backyard.
I am so happy to have our yard look nice and complete again!  Of course in the pictures it doesn't look like we did that much, but in person it's a world of difference.  It's nice to see our yard look alive again instead of looking out at dirt! Thanks for checking out our yard makeover.
XO,
Tara

Wednesday, July 4, 2012

Happy 4th!!

Hope you are all having an amazing day celebrating our Independence Day!!  We have so much to be thankful for and are blessed in so many ways.  I'm proud to say that my dad and grandpas served our country and were all veterans of war.  I'm so grateful and thankful for all of the men and women that make sacrifices for us every day and continue to fight for our freedom. 

As this year the 4th fell in the middle of the week, and of course we have to work before and after, we stayed in town and decided to relax at home and grill out. We made shrimp and vegetable kabobs with grilled corn.  For an appetizer, I made a Red, White and Blue cheese and fruit tray with blueberries, watermelon, and goat cheese.


For dessert, we put popsicles in champagne.  Strawberry and lemonade popsicles of course to keep with the theme of red and white!  Oh and I should mention now that Cupcake Prosseco is our absolute fav to drink.  If you haven't tried it, well you should!!  The Cupcake Pinot and Cab are delish too.  Great bottles of wine in the $10 per bottle range.


One more thing....

HAPPY BIRTHDAY to my beautiful mother!!  Lucky for her she has a wonderful birthday as there are always great parties, days off of work and fireworks to top it all off!!! She's an amazing mother and is one of my best friends too.  Love her very much!!!


XO,
Tara